I have ordered my Cartridges and can’t wait to get them…until then I have been looking online to see what others have done with them and saw some cute examples on this blog.
I’ll post some examples when I get my cartridges!
I have ordered my Cartridges and can’t wait to get them…until then I have been looking online to see what others have done with them and saw some cute examples on this blog.
I’ll post some examples when I get my cartridges!
2 new cartridges will be released August 1st – they’ll coordinate with 2 new Power Palettes. I am so very excited about this!!
Here are a few pictures of the new cartridges and the coordinating Power Palettes:
Cheerful Seasons
Reminisce
The cartridges will retail for $55
1. Multi Purpose Tool – one of the best tools CM offers! The flexible, flat end is perfect for lifting items off sticky mats and repositioning things you’ve stuck down but want to move. The pointed end does a great job punching out those pieces that aren’t cut out completely. I have 3 or 4 of these around my workshop and panic when one goes AWOL ;)
2. Precision Point Adhesive – CM’s glue pen. It applies very easily and dries quickly. If you’re a messy scrapper like I am you may find that cleaning the tip with a baby wipe before capping the pen will help out.
3. Pick Up Square. This little guy gets rid of all the dried up adhesive that gets all over my projects - no matter how careful I am. It also works great to remove those sticky boogers that are all over things I run through a Xyron machine – even after tracing around the edges w/the pointy end of the MP tool.
4. Daisy Case – to store my cartridges and books. I remove all non-essential pages from my books and take the cartridges out of their boxes (still have those – they’re so nice! I’ll have to find some way to use them) The Daisy Case has a velcro divider that can be adjusted –creating a separate space for my cartridges and one for my book & overlays. I’ve written the name on each cartridge to make them easy to grab. The Daisy Case also has a little pocket on the side to hold Cricut markers, an old gift card (to scrape bits off the cutting mat) and other tools.
5. CM Cardstock cuts beautifully with the Cricut! The true 12” x 12” cardstock can be cut on the Expressions with a nice all around border or cut out words along the edges and use in your albums as a nice background!
(Edited to add: you can use MTC to convert almost any image into a cutting file – not just artwork in SBC+. SBC+ does a great job of cleaning up image files to trace in MTC!)
The pages below use mostly elements from a retired CM Trick or Treat Additions Kit – I love the Addition Kits - they come with 4 sheets of double sided paper – 2 of each design, stickers & photo mats. Even with all that great stuff I sometimes still want something different that coordinates with the kit. The 2 papers of the same design are printed exactly the same – this doesn’t always work for me because sometimes (most of the time) I create double page layouts and I like my papers to be mirror images of each other. So I rotated the paper 90 degrees but then the little spider looked really funny sitting in his web sideways. I needed another spider to cover the one up that was printed on the paper. And he needed to be bigger. None of the stickers that came in the Additions Kit would do – so I used SBC+ and the digital version of the Halloween Additions Kit – (which has all the same papers and elements as the traditional version) to create a file that I could cut with my Cricut using Make The Cut Software. It may sound complicated but it is really very easy.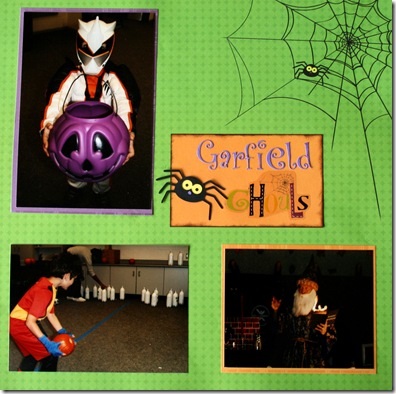 This page shows the web and spider that is printed on 2 sheets of paper in the additions kit.
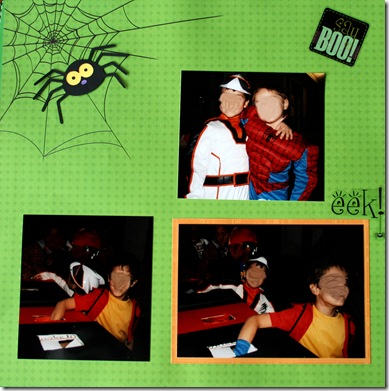
My 2nd page – rotated with a sideways spider underneath the spider I cut out of CM cardstock with my Cricut.
First – I needed to convert the digital spider to a JPEG. I opened SBC+ and saved the spider from the digital Trick or Treat Additions Kit as content. To do this I right clicked on the spider, chose “Save as content” from the menu. This brought up the “Save content to package” popup menu.
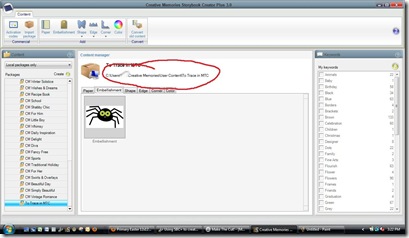
This is where you’ll tell SBC+ to save the spider as a JPEG (from the File type button near the bottom middle) and where to save it (Save in Package button at the top left). SBC+ will only let you save these files to a folder located in the SBC+ Content area.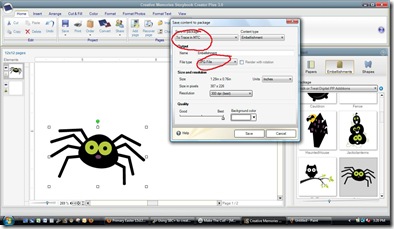 To create a folder go to Content Manager and click on the button next to Create – you’ll have the option of creating a file or a folder. I created a file called “To Trace in MTC” so it will be easy to find later.
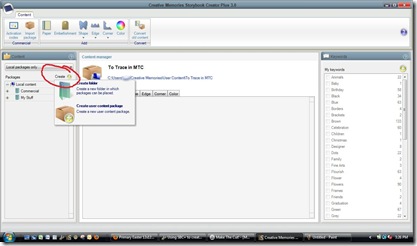
Click Save and then head on over to the MTC program to convert our JPEG spider to a cutting file.
Once you’ve started Make The Cut! You’ll need to click on the Custom Shapes Tab at the left top side of the screen.
Click on the button with the silhouette – that’s the trace button. 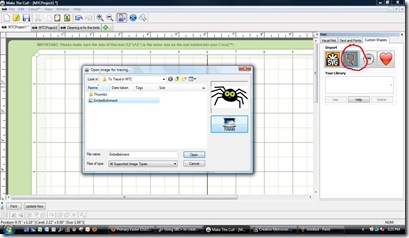 You’ll need to tell MTC which file you want to trace. Navigate to where you saved the spider JPEG and click “open” (if you can’t find where the file is go to the Content Manager in SBC+ click on the file and the location where the file is will be displayed)
This image traces great – but sometimes you need to play around with the threshold – do that by changing the numbers in the box, then clicking "Apply". 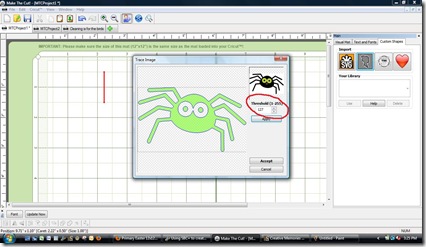 Once you’re happy with the image save it and then cut it with your Cricut or other cutting machine using the Cut button!
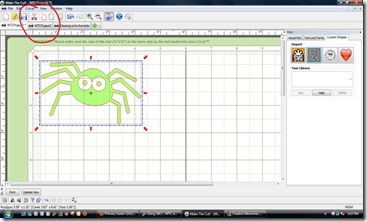
I chose not to cut out the black dots in the center of the eyes and just used a black round tipped CM pen to add the detail.
Clicking “Save” will save it as a MTC file that can only be cut in Make the Cut. If you choose “Export” from the File menu then you can export it as an SVG which is a more widely used format. 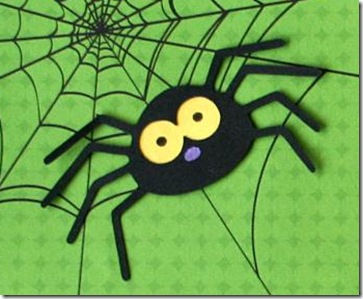 Here’s one of the spiders I added to the page that I cut with my Cricut.
I’m going to go finish up my layout – add some journaling and a few more details but wanted to post this technique. Let me know if you have any questions – and I can’t wait to see what you can do with SBC+ and MTC!
Combining the best of many worlds! I love CM products – use them 99% of the time – the big exception being non CM tools – especially die cutting systems/machines.
I began my die cutting obsession ;) with Sizzix – bought a ton Sizzix and Sizzlit dies but then upgraded to a Wishblade. I loved being able to design my own files, use fonts from my computer and share files with others but I could never get consistent cuts with my Wishblade. As my friends, one by one, got Cricuts I noticed how easy they were cutting things – but I just couldn’t get past the cost of those cartridges! When I heard that there were programs you could use with the Cricut machine to allow it to work like my Wishblade I jumped on the Cricut bandwagon and haven’t looked back since! I do have a bunch of cartridges – and Design Studio – and plenty of other Provo Craft products – but they can’t compare to the flexibility that comes with using Make The Cut! Add that to the gazillion free files that are out there and I one happy scrapper!
Now – I’ve taken things a bit further – using Storybook Creator Plus – Creative Memories' digital scrapbooking program to create files to cut with my Cricut. I would imagine many of these images are copyrighted –and even though I probably purchased some sort of license when I purchased the digital content I will not be sharing those files created directly from the CM digital content. BUT I can show you how to use SBC+ and MTC! to do this on your own!
I do plan on sharing files that are inspired by and designed to compliment products in the CM traditional scrapbooking line.
Thanks for stopping buy – be sure to browse around. Up top you’ll see links to different pages I have – lots of links to free files, tutorials & other good stuff!
Combining the best of many worlds! I love CM products – use them 99% of the time – the big exception being non CM tools – especially die cutting systems/machines.
I began my die cutting obsession ;) with Sizzix – bought a ton Sizzix and Sizzlit dies but then upgraded to a Wishblade. I loved being able to design my own files, use fonts from my computer and share files with others but I could never get consistent cuts with my Wishblade. As my friends, one by one, got Cricuts I noticed how easy they were cutting things – but I just couldn’t get past the cost of those cartridges! When I heard that there were programs you could use with the Cricut machine to allow it to work like my Wishblade I jumped on the Cricut bandwagon and haven’t looked back since! I do have a bunch of cartridges – and Design Studio – and plenty of other Provo Craft products – but they can’t compare to the flexibility that comes with using Make The Cut! Add that to the gazillion free files that are out there and I one happy scrapper!
Now – I’ve taken things a bit further – using Storybook Creator Plus – Creative Memories' digital scrapbooking program to create files to cut with my Cricut. I would imagine many of these images are copyrighted –and even though I probably purchased some sort of license when I purchased the digital content I will not be sharing those files. BUT I can show you how to use SBC+ and MTC! to do this on your own!
I do plan on sharing files that are inspired by and designed to compliment products in the CM traditional scrapbooking line.
Thanks for stopping buy – be sure to browse around. Up top you’ll see links to different pages I have – lots of links to free files, tutorials & other good stuff!